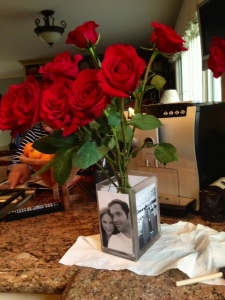
A few days before Christmas, I received a text message from my brother-in-law, asking for my help with a gift idea he had for his girlfriend. He basically said that he wanted to make her a vase with pictures. That was pretty much the beginning AND the end of his idea. Great idea, but he didn’t give me much to work with. Typical man for ya 😉
I decided to call my “crafty” sister and get ideas from her. After we spoke, I hopped on Pinterest and started browsing through “pins” for some better ideas of what I needed to do. Everything I saw and read told me to print the pictures on vellum paper and then use modge podge to “glue” the pictures to the vase… PLEASE NOTE… This does NOT work, so to save you hours of frustration, I will do my best to explain in detail what I did… that actually worked.
WHAT YOU NEED:
– A Vase (I personally like a square-shaped vase, as it makes it much easier to attach the pictures to)
– Pictures (For this I used four 4×6 black and white photos)
– A paper trimmer
-Modge Podge
-Foam paint brushes
NEXT:
1. Trim the pictures (if necessary) to fit the vase.
2. Pour modge podge onto a paper plate and with your foam brush, lightly coat one side of the vase.
3. Place a picture onto the side of the vase you just coated.
4. With the same foam brush, coat the picture with the modge podge until the entire picture and side of the vase are covered.
It should look like this: (If you have never used modge podge before, do not get worried if your picture looks pasty and wet. This is typical until it has dried.)
5. Let it dry and then repeat the process on each side.
– After each picture has been added and the first layer of modge podge has dried, re-apply another coat or 2. (It is completely at your discretion as to how thin or thick you want the coating to be.)
6. Let it dry and then you are DONE.
I was really surprised at how quick and easy it was to make this. Because this was the first time I had tried this, I made it very basic, but now that I know what I am doing, you had better believe I am getting out my Cricut and letting the creative juices flow.
These make for great gifts, home and office decor, even centerpieces for weddings or parties. You can also add water and floating candles for a more intimate look. The possibilities are ENDLESS!
 (Yes, I know these flowers are way to big, but I wanted to give you an idea of what it looks like with red roses! My fav 😉
Again, I am not the best at describing how to do things, so if you have any questions or comments, please feel free to leave them for me. I would love to hear what ideas you all come up with.
Many Blessings ~ Summer


